How do you convert your blog to a Windows 8.1 APP?
Why do you need to convert? Well, you cannot lug along your 17" (OK 14") Laptop, Notebook to an interview, but definitely you can take your Windows Phone and show what you are capable of. I am talking about going to an interview and getting a job.
Your blog can show on a smart phone browser but an app has lot of other things like app bar, charms etc. The Web App Template provides you those extra things needed on an app.
This post shows you how without even having the fancy software like Visual Studio. But if you have VS you can do more. Read along..
In the previous post here,
http://hodentek.blogspot.com/2014/06/web-app-template-2.html
the procedure to download and install the Web App Template was described with a few of the key features.
If you do not have access to Microsoft Visual Studio 2013 Express Update 2, you could still create a project based on Web App Template at the Windows App Studio Beta site here:
http://appstudio.windows.com/Projects
When you are at the above site click of Start new project button shown on this page.

The 'Create' page opens as shown.

Click on Web App Template.
A project template will be displayed. It is now pointing to the Microsoft site (BaseURL: http://m.microsoft.com) and is at a stage where AppBar Buttons (remember that Web App template adds the required items for a Store Application) are configured.


I now click Save to save this information. As soon as I click Save, the preview on this web page changes as shown.

If you have touch sensitive screen you can scroll down the screen as well.
Click on the button with icon of refresh and you will see that button is also pre-configured.

Click on the one marked plus(+) next to refresh. The icon for 'accept' is applied (that is you will get a AppBar button 'accept').
If you want to delete it click on the 'Icon' image.

You can add a suitable 'tile'. Click on Tiles to display.

Let us say We pick the Flip Template which requires two images, a 150x150 pixels and another 340x340px.
Click on the Small Image 150x150px shown in grey.
This opens a page where you can access an image that can be added to your phone application (although this is a Store Application) you can only download code for Windows Phone app.
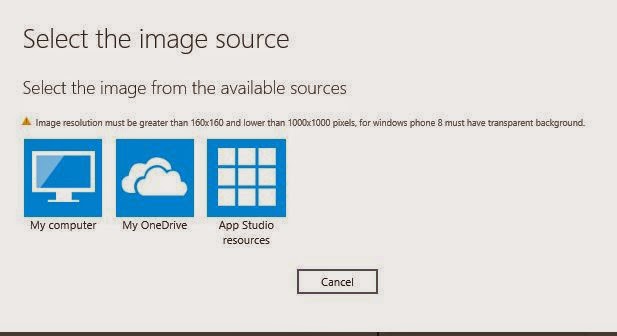
Click on Computer to get an image stored on your computer. Choose a image file (it has to be exactly same size), you will end up in an error otherwise.

The bigger image is screwed up. Let us push on.

Click Save.
Click Finish. Well. We can always come back and refine.
Click on Generate.
You get the following dialog displayed. It is really for WEB and not for Windows. Well and Good.

Click Windows Phone 8 and click Generate.

You can download the file WAT80APP.zip to your computer.
If you do not have VS2013 then may be you should go to PublishInfo tab and follow it up to deploy to your Phone (device).
That is all there is to it.
In fact, if do a Bing Search to your Blog Site URL, it pretty much does the same thing. There may be slight differences. You can check and see the Home and Refresh AppBar buttons are functional.
Describing the config.json for this will be in another post.
enjoy!
Your blog can show on a smart phone browser but an app has lot of other things like app bar, charms etc. The Web App Template provides you those extra things needed on an app.
This post shows you how without even having the fancy software like Visual Studio. But if you have VS you can do more. Read along..
In the previous post here,
http://hodentek.blogspot.com/2014/06/web-app-template-2.html
the procedure to download and install the Web App Template was described with a few of the key features.
If you do not have access to Microsoft Visual Studio 2013 Express Update 2, you could still create a project based on Web App Template at the Windows App Studio Beta site here:
http://appstudio.windows.com/Projects
When you are at the above site click of Start new project button shown on this page.
The 'Create' page opens as shown.
Click on Web App Template.
A project template will be displayed. It is now pointing to the Microsoft site (BaseURL: http://m.microsoft.com) and is at a stage where AppBar Buttons (remember that Web App template adds the required items for a Store Application) are configured.
- Click on Create
I now click Save to save this information. As soon as I click Save, the preview on this web page changes as shown.
If you have touch sensitive screen you can scroll down the screen as well.
Click on the button with icon of refresh and you will see that button is also pre-configured.
Click on the one marked plus(+) next to refresh. The icon for 'accept' is applied (that is you will get a AppBar button 'accept').
If you want to delete it click on the 'Icon' image.
You can add a suitable 'tile'. Click on Tiles to display.
Let us say We pick the Flip Template which requires two images, a 150x150 pixels and another 340x340px.
Click on the Small Image 150x150px shown in grey.
This opens a page where you can access an image that can be added to your phone application (although this is a Store Application) you can only download code for Windows Phone app.
Click on Computer to get an image stored on your computer. Choose a image file (it has to be exactly same size), you will end up in an error otherwise.
The bigger image is screwed up. Let us push on.
Click Save.
Click Finish. Well. We can always come back and refine.
Click on Generate.
You get the following dialog displayed. It is really for WEB and not for Windows. Well and Good.
Click Windows Phone 8 and click Generate.
You can download the file WAT80APP.zip to your computer.
If you do not have VS2013 then may be you should go to PublishInfo tab and follow it up to deploy to your Phone (device).
That is all there is to it.
In fact, if do a Bing Search to your Blog Site URL, it pretty much does the same thing. There may be slight differences. You can check and see the Home and Refresh AppBar buttons are functional.
Describing the config.json for this will be in another post.
enjoy!


Comments