Creating Projects with Intel XDK, ListView - Part 3
In my previous post http://hodentekmobile.blogspot.com/2014/08/creating-projects-with-intel-xdk-part-2.html I covered the various project options that you can choose for designing your apps that can be accessed by multiple devices, iPhones, Windows Phones, iPads etc.
In this post I describe the steps to create a ListView App with the Intel XDK using the published templates.
A list view consists of a list and when you click on one of the list items, you get a detailed page related to the item. This is a very common type of application.
Download the source code for the template from github here:
https://github.com/gomobile/template-list-view-ad
The following note is from the above site:
'App Designer Ready-This template can be used for simple list view application
that has a main view with scrollable list and detail view for each list item,
this template can be used for creating applications similar to Mail app, Messages
app or Twitter* app'
After downloading the code, extract to a folder (Herein MyListView)
Launch Intel XDK and choose Start with a template and browse to the extracted folder location.
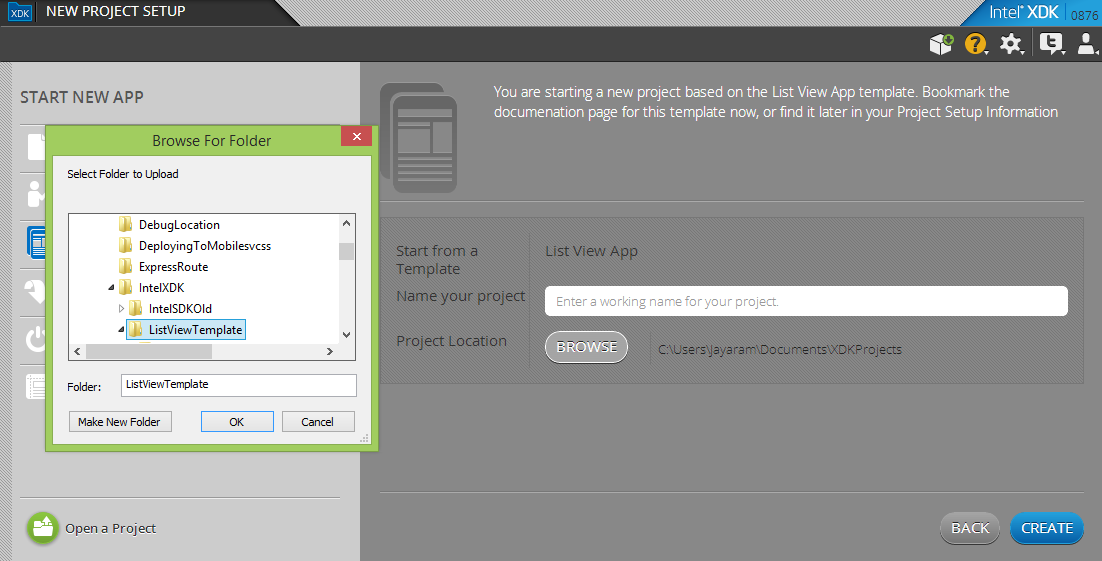

The extracted folder is as shown:

In the Intel XDK after browsing to the folder location click Create.
It will take a few seconds and you get a 'Success' message.
Click OK to the message.
The complete IDE is revealed as shown.

These are the top menu items (from left)
Projects--showing MyListView
Develop
Emulate
Test
Debug--Preview
Profile--Preview
Build
Services

Below the menu is the toolbar that has two buttons CODE|DESIGN followed by an
icon 'i' which can toggle the Code\Design views. This is followed by the
'reload', 'delete', 'Activity log'. This group is then followed by screen related
ico that can be Phone (320x480),phablet (360x640) or tablet (768x1024);
orientations; and 'Guide Lines'. At the right end you have 'click to download
updates', 'App Designer Videos in the question mark'; 'General information', 'Intel Twitter Feeds', and 'logout'.
Below the toolbar you will find Working files (starts with index.html) and the
folder for the template (MyListView)

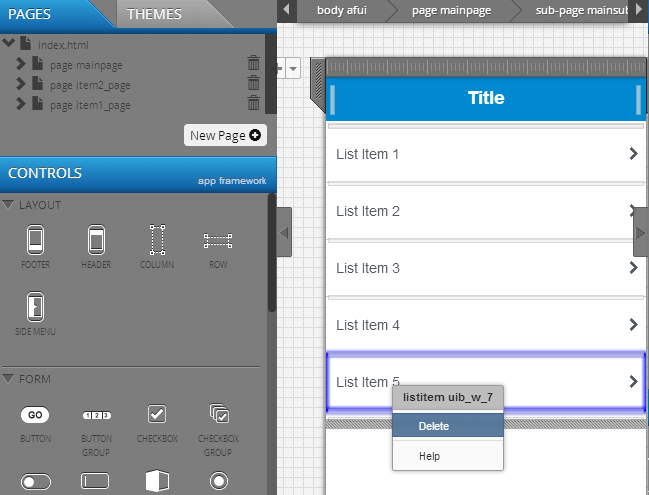
The next tab show the Pages and Controls.

In the 'Pages' tab you find the Mainpage and six item pages. You could also add a
page by clicking the New Page or delete pages if you do not need.
There are also controls that you can drag and drop. Note that the controls conform to the App frame work.

The 'Themes' tab allows you to set the theme for the type of device you choose. The next image shows the theme set for Windows Phone dark. For this post, the 'Phone' device type has been chosen (the other two are Phablet and tablet mentioned previously in the toolbar description). You could choose any of the available themes from the drop-down list.

In order to simplfy, before we proceed we will delete all but the two itmes pages as shown. You can delete from the tab 'Pages'.
Presently the code for the pages are as shown:
.png)
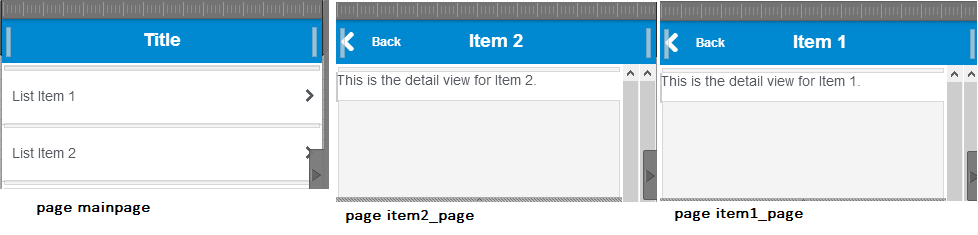
Click on each of page mainpage, page item2_page, and page item1_page and you will
see that the displays of those are as shown in this composite image.
ListView12
Checking the page navigation in an emulator
Without doing anymore modification we can check how the page navigation is working by testing on an emulator.
Click on the 'Emulate' tab in the menu tabs after choosing Nokia Lumia 920 in the 'DEVICES' as shown.

Clicking on Item1 in the list opens the page for Item1 and the back button brings
it back to mainpage. Item2 list item works in the same way as shown in next
image.

How was this achieved without any coding? The explanation can be seen in the
screen shot of page main page set up. The next image shows the page as it is designed on the left and its properties on the right. The title of the main page is Title. There is no need for a back button for this page.

The two list items when clicked go to the hyperlinks shown in the INTERACTIVITY pane.

What about ListItem1 and ListItem2 pages?
These are simple pages with a back button that takes you back to the Main Page as shown in this image.

You can modify the template to add your content, images, media etc.
Here is a picture of the app (on the Intel XDK Server) showing clicked page for Item2 on a Nokia Icon and an IPad (photo taken with Windows Phone Nokia Icon on top of an iPad)..

Read about the September 2014 Intel XDK release here:
http://hodentek.blogspot.com/2014/09/new-intel-xdk-release-september-2014.html
In this post I describe the steps to create a ListView App with the Intel XDK using the published templates.
A list view consists of a list and when you click on one of the list items, you get a detailed page related to the item. This is a very common type of application.
Download the source code for the template from github here:
https://github.com/gomobile/template-list-view-ad
The following note is from the above site:
'App Designer Ready-This template can be used for simple list view application
that has a main view with scrollable list and detail view for each list item,
this template can be used for creating applications similar to Mail app, Messages
app or Twitter* app'
After downloading the code, extract to a folder (Herein MyListView)
Launch Intel XDK and choose Start with a template and browse to the extracted folder location.
The extracted folder is as shown:
In the Intel XDK after browsing to the folder location click Create.
It will take a few seconds and you get a 'Success' message.
Click OK to the message.
The complete IDE is revealed as shown.
These are the top menu items (from left)
Projects--showing MyListView
Develop
Emulate
Test
Debug--Preview
Profile--Preview
Build
Services
Below the menu is the toolbar that has two buttons CODE|DESIGN followed by an
icon 'i' which can toggle the Code\Design views. This is followed by the
'reload', 'delete', 'Activity log'. This group is then followed by screen related
ico that can be Phone (320x480),phablet (360x640) or tablet (768x1024);
orientations; and 'Guide Lines'. At the right end you have 'click to download
updates', 'App Designer Videos in the question mark'; 'General information', 'Intel Twitter Feeds', and 'logout'.
Below the toolbar you will find Working files (starts with index.html) and the
folder for the template (MyListView)
The next tab show the Pages and Controls.
In the 'Pages' tab you find the Mainpage and six item pages. You could also add a
page by clicking the New Page or delete pages if you do not need.
There are also controls that you can drag and drop. Note that the controls conform to the App frame work.
The 'Themes' tab allows you to set the theme for the type of device you choose. The next image shows the theme set for Windows Phone dark. For this post, the 'Phone' device type has been chosen (the other two are Phablet and tablet mentioned previously in the toolbar description). You could choose any of the available themes from the drop-down list.
In order to simplfy, before we proceed we will delete all but the two itmes pages as shown. You can delete from the tab 'Pages'.
Presently the code for the pages are as shown:
Click on each of page mainpage, page item2_page, and page item1_page and you will
see that the displays of those are as shown in this composite image.
ListView12
Checking the page navigation in an emulator
Without doing anymore modification we can check how the page navigation is working by testing on an emulator.
Click on the 'Emulate' tab in the menu tabs after choosing Nokia Lumia 920 in the 'DEVICES' as shown.
Clicking on Item1 in the list opens the page for Item1 and the back button brings
it back to mainpage. Item2 list item works in the same way as shown in next
image.
How was this achieved without any coding? The explanation can be seen in the
screen shot of page main page set up. The next image shows the page as it is designed on the left and its properties on the right. The title of the main page is Title. There is no need for a back button for this page.
The two list items when clicked go to the hyperlinks shown in the INTERACTIVITY pane.
What about ListItem1 and ListItem2 pages?
These are simple pages with a back button that takes you back to the Main Page as shown in this image.
You can modify the template to add your content, images, media etc.
Here is a picture of the app (on the Intel XDK Server) showing clicked page for Item2 on a Nokia Icon and an IPad (photo taken with Windows Phone Nokia Icon on top of an iPad)..
Read about the September 2014 Intel XDK release here:
http://hodentek.blogspot.com/2014/09/new-intel-xdk-release-september-2014.html
Build Web Apps with Intel XDK
Read about other templates here.


Comments