Develop a Side Menu App using Intel XDK - Part 2
In this post we take a look at the Layout and Controls as well as working with the pages. We will also learn how the SIDEMENU relates to the pages. I assume he have reviewed Part 1.
Let us take a look at the Controls that are available for the Side Menu App. Launch Intel XDK and open the project SideMenu from the previous post. The JavaScript code for this app is from the appFramework.

In the main MENU, DEVELOP click on the switch that toggles between CODE and DESIGN after you have clicked on index.html.
The app framework CONTROLS are as shown in this image.
 AFControls_01
All nodes have been collapsed and you can expand them by clicking on the item, say LAYOUT.
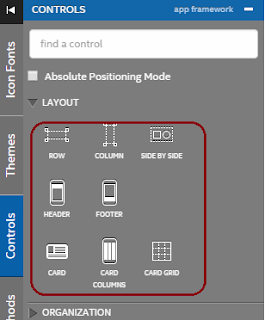
This expands to reveal the controls related to LAYOUT as shown. In addition to HEADERS and FOOTERS you can arrange the layout using, row, column and side-by-side. You could also use CARD style controls either the CARD, CARD COLUMNS or CARD GRID
 AFControls_02
Collapse the LAYOUT and click on ORGANIZATION to display the following:
For the framework chosen there appears to be items, LISTVIEW and LISTITEM

AFControls_03
Collapse ORGANIZATION and expand OVERLAY by clicking on it to display the following:
The toggle overlay item SIDE MENU is the only one shown.

AFControls_04
In a similar manner you should review the rest of the controls.
Now let us take a look at the DOM Tree View for this template. Click on DOM Tree View and display its contents as shown.
 AFControls_05
It has a header, a page#mainpage; a control left.uib_w_2 and a number of pages, #Home, #Favorites, #Message, #Profile which you do not see on the right shown here.

AFControls_06
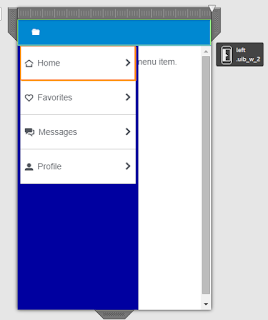
The control left.uib_w_2 is clickable and it toggles between Mainpage with and without SIDE MENU as shown. After clicking the Side Menu it may take a while for the control to show up.
 AFControls_07
[Note the designers could have used some kind of notification by color or message what the Side Menu is doing. However if you click once or twice you will notice the difference]
This Control has a list of four items that can be linked to the 4 pages, #Home, #Favorites, #Messages and #Profile with their own icons. When you click on the > icon you should be able to bring up the page to view. Note that the interactivity does not appear to be present in the template right now.
 AFControls_08
Also for each of the list items, the properties, styles and Interactivity is configurable as shown. For example you can change the icon from the default to any of the other from here.
 AFControls_09
Also if you do not want to use an icon, you may even remove it from the app by taking out the check mark for icon. The src for this link is the href: Page#Home. The default style is used but can be changed using the two buttons.
 AFControls_10
PAGES
We take a look at the Main page and 4 other pages
Click on Pages in App Framework to open the items as shown.

AFControls_12
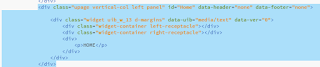
Each of these pages have their own HTML code. This one for #HOME (Click on this and you should see the code in the bottom).

AFControls_13
As you can see the page is empty and you can write in something through the Edit HTML button at the bottom which should allow you to type-in. You can also use the designer tool to insert a Text control and configure it. We will take this route just to show the capability of this IDE.
Click CONTROLS and in COMMON folder show drag and drop the Text from there to page#Home as shown. The text you type now in the PROPERTIES box will be transferred to the page#Home.

AFControls_14
After typing in your text in PROPERTIES the page appears as shown.

AFControls_14B
Accordingly the HTML for the page#Home changes to this:
Once you get a hang for this you should go to index.html and make changes to the other pages as this will be very fast. Using the designer is also OK, but would take considerable time.
Now for each of the pages #Favorites, #Messages, and #Profile insert appropriate text.
In Part 3, We will configure the navigation of the pages, stay with me.
http://hodentekmobile.blogspot.com/2015/12/develop-side-menu-app-using-intel-xdk_19.html
Part 5 here:
http://hodentekmobile.blogspot.com/2016/01/develop-side-menu-app-using-intel-xdk.html
This next part (Part 6) is all about placing images and text formatting:
http://hodentekmobile.blogspot.com/2016/02/develop-side-menu-app-using-intel-xdk.html
Let us take a look at the Controls that are available for the Side Menu App. Launch Intel XDK and open the project SideMenu from the previous post. The JavaScript code for this app is from the appFramework.
In the main MENU, DEVELOP click on the switch that toggles between CODE and DESIGN after you have clicked on index.html.
The app framework CONTROLS are as shown in this image.

All nodes have been collapsed and you can expand them by clicking on the item, say LAYOUT.
This expands to reveal the controls related to LAYOUT as shown. In addition to HEADERS and FOOTERS you can arrange the layout using, row, column and side-by-side. You could also use CARD style controls either the CARD, CARD COLUMNS or CARD GRID

Collapse the LAYOUT and click on ORGANIZATION to display the following:
For the framework chosen there appears to be items, LISTVIEW and LISTITEM
AFControls_03
Collapse ORGANIZATION and expand OVERLAY by clicking on it to display the following:
The toggle overlay item SIDE MENU is the only one shown.
AFControls_04
In a similar manner you should review the rest of the controls.
Now let us take a look at the DOM Tree View for this template. Click on DOM Tree View and display its contents as shown.

It has a header, a page#mainpage; a control left.uib_w_2 and a number of pages, #Home, #Favorites, #Message, #Profile which you do not see on the right shown here.

AFControls_06
The control left.uib_w_2 is clickable and it toggles between Mainpage with and without SIDE MENU as shown. After clicking the Side Menu it may take a while for the control to show up.

[Note the designers could have used some kind of notification by color or message what the Side Menu is doing. However if you click once or twice you will notice the difference]
This Control has a list of four items that can be linked to the 4 pages, #Home, #Favorites, #Messages and #Profile with their own icons. When you click on the > icon you should be able to bring up the page to view. Note that the interactivity does not appear to be present in the template right now.

Also for each of the list items, the properties, styles and Interactivity is configurable as shown. For example you can change the icon from the default to any of the other from here.

Also if you do not want to use an icon, you may even remove it from the app by taking out the check mark for icon. The src for this link is the href: Page#Home. The default style is used but can be changed using the two buttons.

PAGES
We take a look at the Main page and 4 other pages
Click on Pages in App Framework to open the items as shown.
AFControls_12
Each of these pages have their own HTML code. This one for #HOME (Click on this and you should see the code in the bottom).

AFControls_13
As you can see the page is empty and you can write in something through the Edit HTML button at the bottom which should allow you to type-in. You can also use the designer tool to insert a Text control and configure it. We will take this route just to show the capability of this IDE.
Click CONTROLS and in COMMON folder show drag and drop the Text from there to page#Home as shown. The text you type now in the PROPERTIES box will be transferred to the page#Home.

AFControls_14
After typing in your text in PROPERTIES the page appears as shown.

AFControls_14B
Accordingly the HTML for the page#Home changes to this:

Once you get a hang for this you should go to index.html and make changes to the other pages as this will be very fast. Using the designer is also OK, but would take considerable time.
Now for each of the pages #Favorites, #Messages, and #Profile insert appropriate text.
In Part 3, We will configure the navigation of the pages, stay with me.
http://hodentekmobile.blogspot.com/2015/12/develop-side-menu-app-using-intel-xdk_19.html
Part 5 here:
http://hodentekmobile.blogspot.com/2016/01/develop-side-menu-app-using-intel-xdk.html
This next part (Part 6) is all about placing images and text formatting:
http://hodentekmobile.blogspot.com/2016/02/develop-side-menu-app-using-intel-xdk.html


Comments