Develop a Side Menu App using Intel XDK - Part 3
In this post you will learn how to hook up the link controls to the pages to achieve Page Navigation.
This is part 3 of SideMenu Project. If you just landed here, please review Parts 1 and 2 at the following links:
Part 1:Creating a Intel XDK project using a template; SideMenu project UI, SideMenu on iPhone6 emulator
http://hodentekmobile.blogspot.com/2015/11/develop-side-menu-app-using-intel-xdk.html
http://hodentekmobile.blogspot.com/2015/11/develop-side-menu-app-using-intel-xdk.html
Part 2: Review of Controls and Layout as well as working with Pages. Pages in a SideMenu
http://hodentekmobile.blogspot.com/2015/12/develop-side-menu-app-using-intel-xdk.html
If you want the next part, go here.
http://hodentekmobile.blogspot.com/2015/12/develop-side-menu-app-using-intel-xdk.html
If you want the next part, go here.
We have seen in earlier posts, the Side Menu list consisting of,
- Home
- Favorites
- Messages
- Profile
The last three list items have their own icons from the icon's list previously seen.
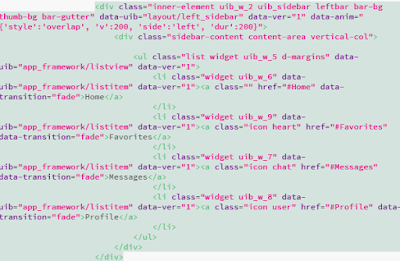
For example, the HTML code for the Favorites page (Click Favorites and review the HTML Preview) as shown is,

The navigation scheme should bring in the page (one of the four) to the view window (phone's displayed area) when the related list item is clicked as shown here:

Nav_02.png
Set up to navigate to Favorites page
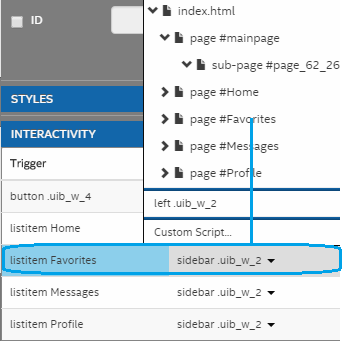
The next image shows the Side Menu with the properties for the list item with the label 'Favorites'. The link reference is page#Favorrites. The icon is also shown, if needed you can remove it.

Nav_03.png
The pane 'INTERACTIVITY' at the bottom has all the actions that you need to hook up. Right now, the Trigger [listitem Favorites] is showing the action [sidebar.uib_w_2] as shown here.

Nav_04.png
Click on sidebar.uib_w_2 and the following pop-up will be displayed.
Nav_05.png
From the pop-up menu choose the item page#Favorites (assuming you started setting up the navigation for Favorites) as shown in the previous image.
After this choice your INTERCATIVITY pane should look like this:

Nav_06.png
Carry out the same for thee list items, Messages and Profile.
The INTERACTIVITY pane should appear as shown (notice the difference between this image and the previous one) .

Nav_07.png
View the result of your work on emulator.
Let us take short break and click on the EMULATE main menu to bring up the emulation of Apple iPhone6 as shown.

Nav_08.png
This is the start page of your app and it is the main page. Now click on the indicated icon to bring the Side Menu. This is what you should see:

Nav_09.png
Now if your interactivity set up has been correctly configured, then clicking each of the list item should bring up the corresponding page as shown for the Favorites list item.

Nav_10.png
Note: The template did not come up with a way to go back to the main page. We will see later how this can be done.
For now, Click DEVELOP and click Reload as shown:
For now, Click DEVELOP and click Reload as shown:

Nav_11.png
Run the emulator again and click the icon on the main page to bring up the Side Menu and verify that the pages (Messages and Profile) are properly linked.
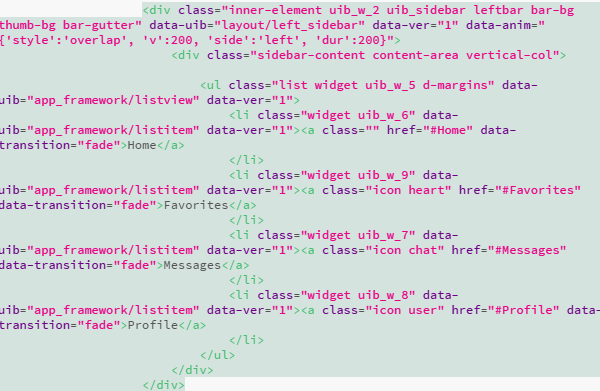
In the index.html page the corresponding HTML has changed as shown.
Nav_12.png
This completes this Part 3 of Side Menu Project
Part 5 here:
http://hodentekmobile.blogspot.com/2016/01/develop-side-menu-app-using-intel-xdk.html
This next part (Part 6) is all about placing images and text formatting:
http://hodentekmobile.blogspot.com/2016/02/develop-side-menu-app-using-intel-xdk.html
Part 5 here:
http://hodentekmobile.blogspot.com/2016/01/develop-side-menu-app-using-intel-xdk.html
This next part (Part 6) is all about placing images and text formatting:
http://hodentekmobile.blogspot.com/2016/02/develop-side-menu-app-using-intel-xdk.html
Comments