Develop a Side Menu App using Intel XDK - Part 8
You have developed an APP such as the Side Menu App and now you want to see how it would look when you bring it up on a smart phone. It is true that it is not complete, as yet. But it is always of interest to know how it would look on a real phone, an Apple phone or some other phone.
In the previous post you have seen how you may use the emulators to view the app you designed is rendered.
In this post you will learn how you may view it on a handheld device be it an iPhone or something other like a Windows 10 Mobile. This step is needed before you package it to be downloaded by anyone from one of the device stores (Google Play, Apple Store or Windows Store)
I assume you have one of these devices at hand, an iPhone or some other compatible with Intel XDK. You will also require Internet Connection via Wi-Fi.
The first thing for you to do is to install the Intel XDK Preview app on your device. This app is available on both Apple Store and Windows Store. If it is an Android, it should be available on Here are quick links to download the apps:
Google Play:
https://play.google.com/store/apps/details?id=com.intel.html5tools.apppreview
Apple Store:
https://itunes.apple.com/us/app/intel-app-preview/id725023841?mt=8
Windows Store:
https://www.microsoft.com/en-us/store/apps/intel-app-preview/9wzdncrdxtck
Follow these steps to display your app on the device
1. I use one of the simple, one page device for the purposes of demo. The page is shown in design as shown.
 DisplayInDevice_00
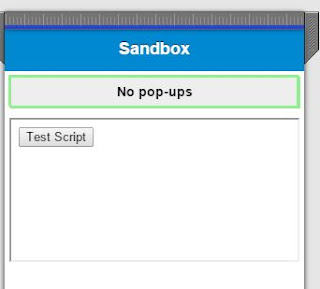
2. In the emulator (randomly chosen emulator type, Nokia) the page appears as shown.
 DisplayInDevice_01
It has two buttons one of which is inside a iFrame widget. Depending on how you set the attributes of the iFrame you can allow/disallow running of scripts. Presently it is set to allow-scritps to run inside iFrame. The top button outside the iFrame just looks for the attributes of the iFrame.
The page works as expected in the emulator.
3. Click the menu Test to display the following:

DisplayInDevice_03
There are two ways to test. Herein we use the MOBILE option which is already selected. Actually as you see in the previous image the steps are laid out in the Intel XDK IDE as well.
We are going to test if this works on the device. You need to push your app (the codes and all) to the Testing Server. In order to do so, click PUSH FILES green button.
You should see an Uploading Projects progress monitoring window. You will get an immediate display as to when the files are pushed.
4. Now you are going to access the files you pushed (in particular the index.html) to the server on your device (iPhone, etc). You need to remember the username/password for your Intel XDK account.
The following image shows the projects that I have pushed so far. it is only accessible to the user id/password of your Intel XDK account.
Now accessing the app I created on the iPhone 6S, I can view the app and verify it functions.
The Intel App Preview was launched. You can view instructions.

Now you can choose the app you wan to view on your device and click the listed item. You can go back make changes, upload to the server and download it to your device.
This is how the app will appear on the iPhone 6S I am using. This is as it appears when the button inside the iFrame is clicked.

Review previous posts of this thread:
Part 1:Creating a Intel XDK project using a template; SideMenu project UI, SideMenu on iPhone6 emulator
http://hodentekmobile.blogspot.com/2015/11/develop-side-menu-app-using-intel-xdk.html
Part 2: Review of Controls and Layout as well as working with Pages. Pages in a SideMenu
http://hodentekmobile.blogspot.com/2015/12/develop-side-menu-app-using-intel-xdk.html
Part 3: Linking the pages and Navigation
http://hodentekmobile.blogspot.com/2015/12/develop-side-menu-app-using-intel-xdk_19.html
Part 4: Adding the BACK button to return to the previous page.
http://hodentekmobile.blogspot.com/2015/12/develop-side-menu-app-using-intel-xdk_26.html
Part 5: Adding pages and organizing controls to the project
http://hodentekmobile.blogspot.com/2016/01/develop-side-menu-app-using-intel-xdk.html
Part 6: Considerations in adding images and other content
http://hodentekmobile.blogspot.com/2016/02/develop-side-menu-app-using-intel-xdk.html
Part 7: Viewing the app on an emulator
http://hodentekmobile.blogspot.com/2016/05/develop-side-menu-app-using-intel-xdk.html
In the previous post you have seen how you may use the emulators to view the app you designed is rendered.
In this post you will learn how you may view it on a handheld device be it an iPhone or something other like a Windows 10 Mobile. This step is needed before you package it to be downloaded by anyone from one of the device stores (Google Play, Apple Store or Windows Store)
I assume you have one of these devices at hand, an iPhone or some other compatible with Intel XDK. You will also require Internet Connection via Wi-Fi.
The first thing for you to do is to install the Intel XDK Preview app on your device. This app is available on both Apple Store and Windows Store. If it is an Android, it should be available on Here are quick links to download the apps:
Google Play:
https://play.google.com/store/apps/details?id=com.intel.html5tools.apppreview
Apple Store:
https://itunes.apple.com/us/app/intel-app-preview/id725023841?mt=8
Windows Store:
https://www.microsoft.com/en-us/store/apps/intel-app-preview/9wzdncrdxtck
Follow these steps to display your app on the device
1. I use one of the simple, one page device for the purposes of demo. The page is shown in design as shown.

2. In the emulator (randomly chosen emulator type, Nokia) the page appears as shown.

It has two buttons one of which is inside a iFrame widget. Depending on how you set the attributes of the iFrame you can allow/disallow running of scripts. Presently it is set to allow-scritps to run inside iFrame. The top button outside the iFrame just looks for the attributes of the iFrame.
The page works as expected in the emulator.
3. Click the menu Test to display the following:

DisplayInDevice_03
There are two ways to test. Herein we use the MOBILE option which is already selected. Actually as you see in the previous image the steps are laid out in the Intel XDK IDE as well.
We are going to test if this works on the device. You need to push your app (the codes and all) to the Testing Server. In order to do so, click PUSH FILES green button.
You should see an Uploading Projects progress monitoring window. You will get an immediate display as to when the files are pushed.
4. Now you are going to access the files you pushed (in particular the index.html) to the server on your device (iPhone, etc). You need to remember the username/password for your Intel XDK account.
The following image shows the projects that I have pushed so far. it is only accessible to the user id/password of your Intel XDK account.
Now accessing the app I created on the iPhone 6S, I can view the app and verify it functions.
The Intel App Preview was launched. You can view instructions.

For accessing your app you need to log in. After which you can see all the apps uploaded to the server.

Now you can choose the app you wan to view on your device and click the listed item. You can go back make changes, upload to the server and download it to your device.
This is how the app will appear on the iPhone 6S I am using. This is as it appears when the button inside the iFrame is clicked.

The next step is to go back to Intel XDK and use the resources therein to package it and place in one of the app stores.
Review previous posts of this thread:
Part 1:Creating a Intel XDK project using a template; SideMenu project UI, SideMenu on iPhone6 emulator
http://hodentekmobile.blogspot.com/2015/11/develop-side-menu-app-using-intel-xdk.html
Part 2: Review of Controls and Layout as well as working with Pages. Pages in a SideMenu
http://hodentekmobile.blogspot.com/2015/12/develop-side-menu-app-using-intel-xdk.html
Part 3: Linking the pages and Navigation
http://hodentekmobile.blogspot.com/2015/12/develop-side-menu-app-using-intel-xdk_19.html
Part 4: Adding the BACK button to return to the previous page.
http://hodentekmobile.blogspot.com/2015/12/develop-side-menu-app-using-intel-xdk_26.html
Part 5: Adding pages and organizing controls to the project
http://hodentekmobile.blogspot.com/2016/01/develop-side-menu-app-using-intel-xdk.html
Part 6: Considerations in adding images and other content
http://hodentekmobile.blogspot.com/2016/02/develop-side-menu-app-using-intel-xdk.html
Part 7: Viewing the app on an emulator
http://hodentekmobile.blogspot.com/2016/05/develop-side-menu-app-using-intel-xdk.html


Comments